


From full-text search à la Google to precise filtering: DocuWare offers lots of different possibilities for finding documents quickly. Here’s how to configure DocuWare search dialogs to get search results...in the fastest way possible!
Contents:
- Search dialogs in DocuWare – a brief introduction
- Create new search dialogs as needed
- Less is more: Hide and sort search fields
- Practical: Activate filter option "Stored by"
- Extra tip for more efficiency: Predefined search fields
- Defining Users
Search dialogs in DocuWare – a brief introduction
By customizing search dialogs in the DocuWare Client, you can filter for archived documents and access them. When creating a file cabinet, a default search dialog is automatically generated. But this can be further adapted through DocuWare configurations (provided you have file cabinet editing rights) – from the naming to the displayed fields and their sorting. In addition, you can create as many additional search dialogs as you like per file cabinet and tailor them for max efficiency.
Below, we've put together some basic tips and short video tutorials on how to create and customize a search dialog – in this example, a search for contracts.
Create new search dialogs as needed
It often makes sense to set up several search dialogs per file cabinet. The default search dialog then contains as many filter options as possible. Additional search dialogs, on the other hand, can be very specific, e.g. limited to one document type or even limited to a full-text search only. Everything is possible and basically the following applies: A new search dialog is simply created for each file cabinet by clicking on the “Plus” under “Dialogs” in the "Search" tab:

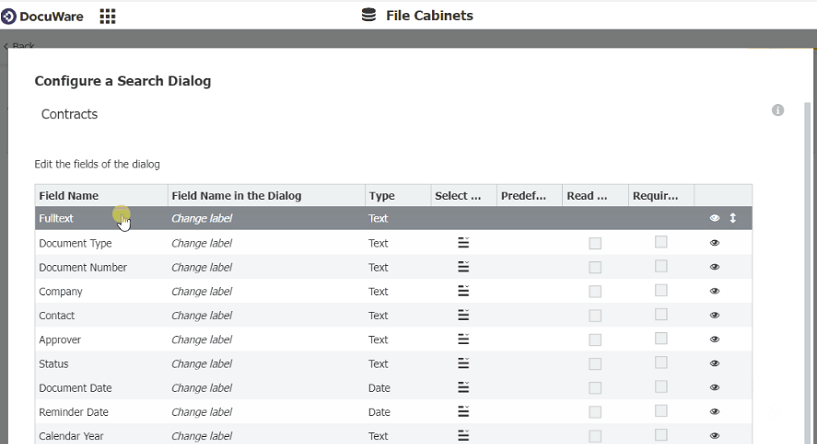
Less is more: Hide and sort search fields
Regardless of whether it is an automatically generated default search dialog or a newly created one: Each search dialog initially contains all database fields that are activated for a file cabinet. Under certain circumstances, there can be a large number of them, which are usually not all needed for a targeted search. To streamline a search dialog, hide non-relevant fields by clicking on the eye icon. In addition, you can easily drag and drop the order of the fields into a suitable order. For example, place the field for the full-text search at the top:

Practical: Activate filter option "Stored by"
System fields, i.e. fields that are automatically assigned and filled by the system, can also be integrated into search dialogs, but are not included by default, with the exception of the "Stored on" field. However, one system field that is highly appreciated by many users as a filter option is the "Stored by" field. This allows you to quickly filter for all documents that you have stored in the file cabinet, for example. If necessary, activate this system field by clicking on the eye icon:

Extra tip for more efficiency: Predefined search entries
By configuring the search dialog, it is also possible to pre-populate fields with search entries. In our example, this means that you can automatically fill in the field "Document type" with the search term "Contract," so that manual entry is no longer necessary later in the search.
Define the predefined entry by clicking on the corresponding field when configuring the search dialog, then selecting "Custom" under "Predefined entry" and entering the desired search term as a value.
If you also activate "Read only", this value cannot be changed later in the search dialog. Otherwise, users can also delete it manually and flexibly enter a different term:

Defining Users
Last but not least, confirm your changes with “OK” and assign the new search dialog to all users or roles that will use this search dialog:

The new search dialog is then ready to go in the DocuWare Client:
