When you email documents to business partners, you need to make sure that only the right annotations are included or visible. It’s easy to do: just select the annotation levels you want the recipient to see before sending a document out. Here’s how...
DocuWare lets you add annotations to documents. Some examples: an approval stamp on an invoice or a comment note on a project plan. In DocuWare, you can use up to five levels or layers for annotations, which are placed over the document like transparencies. The core document itself remains unchanged. These different layers can each be shown or hidden in the viewer.

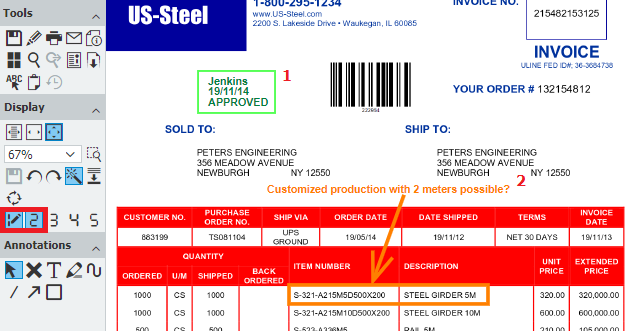
This document has two annotation levels: one for internal use (green layer 1) and one for external use (orange layer 2).

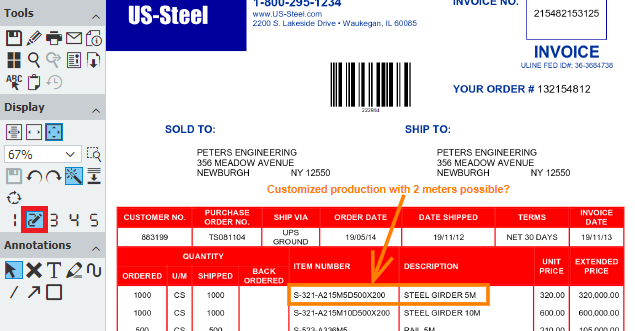
Layer 1 has now been hidden. Only the question that the supplier needs to see is visible on layer 2.
Determining annotation levels: Who should see what?
In general, it helps to simplify your processes if you differentiate between groups of people using a document when setting up the annotations. For example, there may be a layer that’s designed for purely internal company annotations and those intended for external parties to see. In this case, you can create two annotation layers. Or perhaps it makes more sense for you to have four layers for four different departments.
In the viewer, you can show and hide the layers using the numbers found in the toolbar in the Display area. If you do not see these numbers, or not all of them, go to Profile and Settings in the DocuWare menu and switch to the Viewer tab. In the toolbar under Display, simply activate individual annotation levels by clicking on the eye.
Options for sending PDFs
Depending on where you are working in DocuWare, you‘ll have different options when sending out documents regarding annotation levels. It's worth taking a closer look:
- In the viewer‘s toolbar, you have the best choices for the purpose discussed here. Here you can choose between a PDF with visible annotations and a PDF without annotations.

In our example, we only want to show layer 2 and so we select Send document as PDF with visible annotations. This way, only the annotations of the activated layer will be included in the PDF for the email attachment. To make sure you only include a specific annotation layer for external eyes to see, first open your document in the viewer, hide the internal first annotation layer and then send the document with the option described above. - In the context menu of a result list, tray, folder or task list you can also choose between sending a PDF with all annotations and a PDF without annotations.
- For workflows, you can set things up in Workflow Designer so that emails are automatically sent with a PDF document attached. As in the previous point, you can choose to include all annotations or none.

